![]()
Honda MB5 (US) Regulator/Rectifier Modification Installation Instructions
The Honda MB5 two-stroke was imported to the USA only in 1982. As a cost-cutting move the bike’s electrical system featured only a single diode rectifier to convert the bike’s AC (alternating current) from its alternator to DC (direct current) to power the ignition system and all the lighting. While a single diode rectifier works to change AC into DC, all modern bikes and cars now use what’s called a Regulator/Rectifier that does much more than the MB5's single diode.
The MB5s for the US have a 12-volt DC system with a lead/acid battery charged by the motor's alternator through this single diode.
Diodes do not regulate voltage; they only rectify AC voltage—turn it into DC voltage. A voltage regulator is an electronic device that holds the alternator's output voltage to a relatively constant narrow range, the ideal range for the lights and ignition system on the motorcycle. A stock MB5 alternator's output voltage is dependent on the engine’s RPM because it doesn't have a voltage regulator—the higher the RPM, the higher the voltage it generates and visa-versa.
On my personal MB5 I found that when I measured the DC voltage output from the alternator with the engine running, the voltage ranged from a low of 9 volts at idle to a high of 20 volts at high RPM. In fact, if you examine the MB5 (US) wiring diagram, you'll see that all but two of the lights are powered by AC directly from the alternator*. Only the power to charge the battery and light the taillight and neutral indicator passes though the single stock diode (this is why ONLY the taillight works when the motor is not running since only the tail light and neutral indicator run directly off the battery):
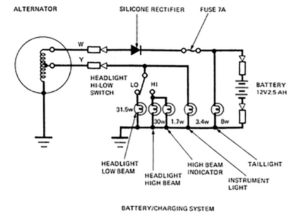
*This is especially bad if you want to run LED lights instead of filament bulbs. While the stock incandescent bulbs can run on AC or DC power, LED's require DC (rectified) power ONLY!
Benefits from fitting a modem electronic rectifier/regulator vs the stock single diode:
- Brighter and more stable lighting (and kinder to LED lighting)
- Reliable charging from lower engine speed without overcharge
- Consistent battery charging at all RPM, no low speed discharging
- Easier starting due to greater battery power
- Longer battery and bulb life
- Lower battery maintenance (less “topping up” wet-cells)
The MB5 runs great as it came from the factory. The ignition system doesn't seem to care about the varying voltage, but since the voltage varies, the lights run dim at low RPM and very bright at high RPM. The MB5 was designed to be ridden at HIGH RPM. Since an MB5 only displaces 50cc, you ring it out to get the most power because there isn't much at low revs. Unfortunately at high RPM its 12-volt light bulbs don’t just burn brighter above 14 volts, they burn out! When I got my MB5 most of the light bulbs were burnt out, including all the meter lights. In addition, charging a 12-volt battery at voltages higher than 14 volts reduces its service life. This is why all modern motorcycles (two or four strokes) have a Regulator/Rectifier that not only changes the AC into DC, but also holds the alternator voltage output between 13 and 14 volts consistently using sophisticated electronics, regardless of RPM. On my MB5 the newly installed Regulator/Rectifier holds the output voltage between 13.6 and 13.8 volts from idle all the way to redline.

*LED lights are even less tolerant of voltages higher than 14 volts (and don't last long with voltage lower than 12 volts either) and burn out faster than incandescent (filament) bulbs at the higher and lower voltages generated by unregulated electrical systems (I know from personal experience; when I changed out my bulbs for LED’s I promptly blew out several on my first spirited run).
Disclaimer: This modification worked for me and I have no doubt it could work for you too. It is pretty straight-forward and well documented for other single diode cycles. However I make no guarantees that following my directions will work for you due to of all the variables involved in do-it-yourself wiring projects. I’ve written in detail everything I did to make this modification work on my bike—and it works marvelously—but I’m not responsible if anything goes wrong when you try this modification on your bike. If you wish to make this modification on your MB5, I recommend you have some electrical wiring skills before you proceed.
Pre-Installation:
-
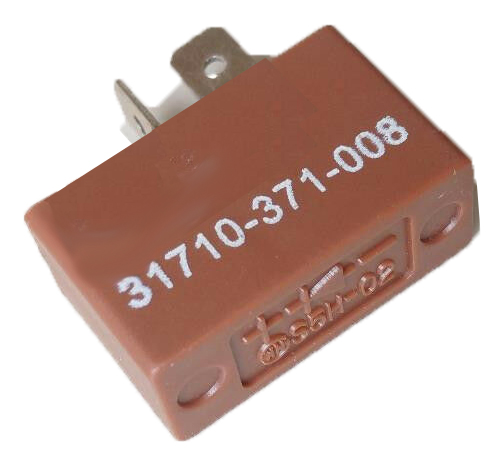
Purchase an aftermarket four-wire reputable Regulator/Rectifier: I purchased this one:

Here is a link to the very one I used successfully on my MB5:
https://www.amazon.com/gp/product/B07L74Q56R/
Other makes and models of Regulator/Rectifiers like this are common, somewhat generic, and widely available. They are relatively low in cost considering the improvement they make to an MB5’s electrical system. I purchased the one listed above because it also came with the other half of the electrical connector and the wires I needed to hook it into my existing electrical system. Many other models and brands of Regulator/Rectifiers will work just as well and may be even cheaper. The important detail here is you need a FOUR WIRE Regulator/Rectifier!
The only other parts you’ll need are mounting hardware (usually not included with the Regulator/Rectifier) and a means of interconnecting the wires together from the MB5's stock electrical system to the Regulator/Rectifier’s wires.
You’ll need to decide where you wish to mount the Regulator/Rectifier. The Regulator/Rectifier has a finned aluminum housing to dissipate the heat the unit generates in keeping the voltage constant (bypassing that extra voltage above 14 volts generates some heat), so you’ll want to find a mounting place that has some air flow. You have lots of options on an unfaired motorcycle.
Somewhere near the MB5’s stock rectifier is an obvious choice since that is where the alternator’s wires are easily accessible.
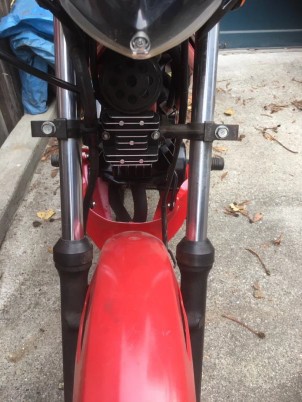
I chose to mount my Regulator/Rectifier up front between the forks and under my horn where it would get plenty of airflow. This wasn’t necessary, but I thought it was a nice tribute to the classic old Triumph Bonneville which had its rectifier mounter prominently in this location:
Recommended Wiring Modification:
For this modification you’ll need to connect the Regulator/Rectifier wiring directly to the wires coming from the alternator cable, the main electrical cable coming out of the left side engine case and going up to the frame. This cable contains all the wires you need to connect to, plus a few more:
-
Green = Ground
-
Yellow = Stator output 1
-
White = Stator output 2
-
Light green/red = Neutral switch*
-
Blue/yellow = CDI trigger*
-
Black/red = CDI power*
Here’s the important section of a US MB5’s wiring diagram:
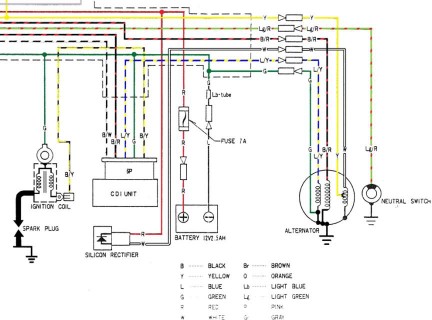
Of the wires coming from the left side engine case, you only need to mess with the Green, Yellow, and White wires. *All the other colored wires listed above simply remain connected the way they were on your running bike.
Using either crimp plastic electrical connectors (none are supplied with the Regulator/Rectifier) or solder the joints covered with shrink-tubing to prevent wires shorting out. Give each wire connection a small tug—if the wires come loose, try a better connection.
Connect the following wires on the Regulator/Rectifier to the following wires from the motor’s alternator main electrical cable:
-
Connect the Alternator’s Green wire to Regulator/Rectifier’s Green wire
-
Connect BOTH these green wires with another wire to a solid grounding point on the frame (such as a bolt on the frame where the paint has been sanded down to shiny metal)
-
Connect the Alternator’s Yellow to Regulator/Rectifier’s Yellow wire
-
Connect the Alternator’s White to Regulator/Rectifier’s Pink wire
-
Connect the Regulator/Rectifier’s Red wire to the white wire that goes to the OEM MB5 diode (under the seat)*
*This is the POWER wire that supplies both the regulated (now) charging voltage to the battery, the ignition system, and all the lighting.
It’s wise to bundle these wires and cover them with electrical tape for waterproofing
That’s it!
If your bike started right up before, it should start just the same now that the Regulator/Rectifier is installed. If it doesn’t start, first check your wire-to-wire color and electrical connections.
This modification does not produce more horsepower, higher RPM, or easier starting. You won’t notice a difference while riding your bike, only now your bulbs won’t burn out nearly as often and your battery should last longer with the Regulator/Rectifier’s more consistent charging voltage.
Final notes:
If you’re thinking of switching to LED lights (12 volt) this modification will help a lot. I burned out A LOT of LED bulbs (not cheap) before I made this modification.
Some people will tell you that you don’t need to go to all this trouble, just to install a large resistor in your bike’s electrical circuit.
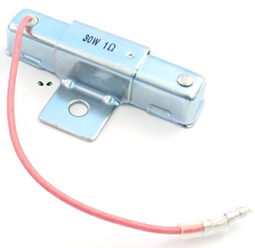 This is a crude fix that will not do what a real Regulator/Rectifier does; it will simply make your lights dimmer than they were already. In addition, these huge metal-clad resistors get VERY HOT, too hot to touch and hot enough to melt plastic. Anyway, a Regulator/Rectifier is not just a modern solution, it’s way more cool!